Thursday, September 15, 2011

Hot Crab Dip

Crab Dip 1

I have made this dip several times and had it posted on a previous blog I co-wrote on.  I bust it out every once in awhile, and people are constantly texting me for the recipe.  I have tweaked it a bit, but I think I've got it now.  For those of you that know already, I go to the local Chinese restaurant and have them fry me won ton strips almost like chips and used to walk out with 2 big bags for $4!! Yes you heard me right, four dollars!  *This has since changed...not sure if it's due to the fact that they realized they should charge more, or the fact that all of my town has gone in asking for chips, but it's now $3 for one bag (which is plenty)... I say don't blame me, blame the dip.  I cannot be held responsible for a sudden shortage in cream cheese, crab meat, and wontons.  Buying the "chips" is significantly cheaper than me making my own (which you could very well do, and would probably be healthier)  Enjoy!

Crab Dip 2

Hot Crab Dip
printable recipe
serves 12 people

Ingredients
8 oz. cream cheese softened
3/4 cup sour cream
4 Tbsp. mayo
4 Tbsp. butter, softened
1 bunch green onions, chopped
1 Tbsp. diced jalapenos (I think I added more than that just because I like things spicy)
1 tsp. seasoned salt (you could also use Old Bay)
cracked pepper to taste
dash of hot sauce
1/2 tsp. Paprika
2 (6 oz.) cans white crab, drained
1 cup mozzarella cheese
Parmesan Cheese (optional)

Directions
Blend first 4 ingredients until smooth, add salt, paprika, pepper, and hot sauce.  Blend.  Stir in the rest of the ingredients and bake @ 350 for 20 min.  I put more mozzarella cheese on top for the last 5 minutes of baking. 
Pin It!

Monday, September 12, 2011

Cinnamon Roll Pancakes

CR Pancakes 1
Oh sweet baby Jesus these things were quite possibly the best thing I have eaten in a very long time.  A very long time I tell ya'.  With the hubs out of town, I had my little sisters (in-law) over for a slumber party and had these on the menu for breakfast.  Timothy isn't a big breakfast man, and to be honest I like more of a savory breakfast, but one of the little sistas has a major sweet tooth.  Major.  So I knew these would be the way to her heart.  She is hilarious, with a great wit and sense of humor.  When a 12 year old looks at you after one bite and says, "if I'm ever in the hospital I want this to be my last meal," you know you've got a winner.  It does take awhile, but the results are amazing! An honestly we both agreed that you could use the pancake batter recipe and have great pancakes on their own!  Before I give you the recipe though, you have to look at this eye candy...

CR Pancakes 2
CR Pancakes 3
CR Pancakes 4
CR Pancakes 5
CR Pancakes 6

Cinnamon Roll Pancakes
printable recipe
makes 6 pancakes
Pancakes
3/4 cup milk
2 tablespoons white vinegar
3/4 cup all-purpose flour
1/2 cup whole wheat flour
2 tablespoons white sugar
1 teaspoon baking powder
1/2 teaspoon baking soda
1/2 teaspoon salt
1 egg
2 tablespoons butter, melted
Cinnamon Roll Filling
1/2 cup softened butter, almost melted
1 cup packed brown sugar
2 Tbsp. cinnamon

Glaze

4 Tablespoons butter
2 ounces cream cheese
3/4 cup powdered sugar
1/2 teaspoon vanilla extract

Directions
1.  In a medium bowl, mix butter, brown sugar and cinnamon. Scoop the filling into a squeeze bottle (I used an old mustard bottle) or small zip baggie and set aside. You don't want this to remain super-liquified. It's best if it becomes a consistency similar to toothpaste.

2.  In a medium, microwave-safe bowl- heat butter and cream cheese until melted. Whisk together until smooth; whisk in powdered sugar and vanilla extract; set aside.
 
3.  Combine milk with vinegar in a medium bowl and set aside for 5-10 minutes to "sour".

4.  Combine flour, sugar, baking powder, baking soda, and salt in a large mixing bowl. Whisk egg and butter into "soured" milk. Pour the flour mixture into the wet ingredients and whisk until lumps are gone.  If not consistency you like, add a splash more milk.

5.  Heat a large skillet over medium heat, and coat with cooking spray. Pour 1/4 cup of batter onto the skillet, and cook for a minute to let the bottom set up.  Squeeze a spiral of the filling on top of each pancake.  When bubbles begin to appear on the surface, flip carefully with a thin spatula, and cook until browned on the underside, about 3-4 minutes more.  Transfer to baking sheet or platter and keep in a warm oven until ready to serve. 

6.  When ready to serve, spoon warmed glaze onto the top of each stack.
Pin It!

Saturday, September 10, 2011

Taco Seasoning

taco seasoning1
If you have ever looked at the ingredients on the back of a packet of taco seasoning (or if you're like me you avoided looking for years), you may or may not have noticed that there are a lot of funky-named ingredients on the back of the package.  Not to mention the sodium...Oy Vey!  Now, I know that a package of taco seasoning is cost efficient.  As a cheap college student, and newlywed, I figured out where to cut costs.  And taco seasoning was one of them.  Not only was it cheap, but give me something in which I just need to add water and I'll take that any day!  So before you start pumping your fist at the computer and screaming about how I am "out of touch with reality" and "who the heck has time to make something like that?", I have good news for you...you really truly can make your own taco seasoning and you can keep it in your cabinet for quick access.  Oh, and you just have to add water...it doesn't get much easier.

taco seasoning2

Taco Seasoning
printable recipe
makes about 6 servings

Ingredients:
4 Tbsp. chili powder
3 Tbsp. + 1 tsp. paprika
3 Tbsp. cumin
1 Tbsp. + 1 tsp. onion powder
1 tsp. garlic powder
1/4 tsp. cayenne

Directions:
Mix seasoning and store in airtight container for future use.  To make taco meat, brown 1 pound of hamburger.  Drain.  Stir in 3 Tbsp. of the seasoning and add 2/3 cup water.  Cook until combined and thickened. 

**I modified this recipe because I like to chop up 1 small onion and sauté it with the burger.  If your kiddos don't like onion, grate some in they'll never know!  But if you absolutely can't stand onions but like the flavor it adds, then add an extra teaspoon of onion powder to your mix.

Slightly adapted from Annie's Eats
Pin It!

Monday, September 5, 2011

Queso Chicken Penne

queso chicken penne
Let me start off by apologizing for what could possibly be the worst picture in the history of food blog pictures.  Not only was/is the lighting in my house horrible but while I was trying to get “just one good shot” my dear hubby was standing in the background moaning and groaning because he was starving.  Geez.  I have learned through blogging that the worst thing you can do with a dish is plate it up while it is still crazy hot.  All it is going to do is run all over the plate.  And that’s exactly what happened.  Sorry, but I wasn’t going to sacrifice my hungry husband for the sake of the blog.  And thus the ugly picture was born.  But while the picture was less than stellar, let me tell you the pasta was FAB. When the hubs requested it 3 days later, I knew we had a keeper. 
queso chicken penne2

Queso Penne Pasta
printable recipe
makes one 9x13 casserole dish or 2 square casserole dishes

Ingredients:
1 lb. penne pasta
2 Tbsp. olive oil
1 Tbsp. butter
1 large onion, diced
4 cloves garlic, minced
1 jalapeno, seeded and diced (leave some seeds for heat)
1 tsp. cumin
1 tsp. chili powder
2 Tbsp. flour
2 cups milk (I used skim)
1 tsp. salt (more to taste)
8 oz. reduced fat cream cheese, cut into cubes
2 cups shredded cheese of choice (I used a Mex-blend)
1 can Rotel
4 cups shredded chicken

Directions:
1.  Heat the oven to 350° and spray a 9x13 casserole dish with non-stick spray (I separated this dish into two smaller casserole dishes and froze one for future use)

2.  Cook the pasta according to the directions for al dente.  Drain and set aside 

3.  In a large pan over medium heat, cook the onion and peppers until they begin to soften.  Add the garlic and continue cooking for a few more minutes.  Add the cumin, chili powder, and salt and cook until spices become pungent. 

4.  Add the flour and cook for 3 minutes, stirring constantly to cook the flour taste out.  Gradually whisk in the milk and stir until smooth.  Bring the mixture to a simmer and allow to thicken.  Turn heat to low and add the cream cheese and a handful of the shredded cheese.   Whisk until completely melted.  Stir in the can of Rotel. 

5.  Mix the chicken and cooked pasta and pour into prepared casserole dish.  Pour the sauce over the top, moving the mixture around slightly to let the sauce run through the pasta.  You can mix it all together if you prefer.  Top with remaining shredded cheese. 

6.  Bake in preheated oven for 20-30 minutes or until bubbling.  Let stand 5-10 minutes before serving. 

Adapted from Evil Shenanigans
Pin It!

Wednesday, July 20, 2011

Biscuits and Gravy…It’s all about the technique!

Final
So biscuits and gravy isn’t quite a light summer dish, but my husband and I love having breakfast for dinner so this works perfectly when I’m in a hurry.  Some people have trouble making biscuits and gravy because either their gravy turns out lumpy, runny, bland, etc.  And while there are many techniques to making biscuits and gravy, I have found that this works best for me.  Hopefully you will find it helpful because this isn’t really a recipe, it’s just a more of a process.
raw biscuits
First we have to start with the biscuits.  Let me preface by saying there is NOTHING wrong with canned biscuits.  In fact, when I am in a hurry, or if they are on sale and I have a coupon I’ll snatch some up!  But these are my favorite biscuits.  Timothy says that they are better than canned and really taste homemade.  You really think I’d slave over some biscuits??  Hush your mouth!  These are what I like to call in-betweensies.  Halfway between canned, and slaving your sweaty, flour covered self off in the kitchen (sorry for the mental picture)…I mix, knead, and roll out….wait for it….Bisquick.  Yes you heard me.  Get some Bisquick, and use the recipe for cut biscuits on the box.  Trust me on this one.  And you don’t need a fancy biscuit cutter, just use a drinking glass!  Making the biscuits takes me about 5 extra minutes.  And I happen to think that 5 extra minutes is worth it.
Raw and Sage
Next we need to cook the sausage.  Biscuits and gravy don’t need to be fancy. Seriously people, it’s milk gravy and pork.  There’s not much more you can do to class it up.  But if I’m feeling frisky, I’ll put in about a half palm-full of sage.  It just adds a lot of flavor and you can buy the super cheap sausage, no one will notice.  Cook up the sausage until it looks like this…
cooking sausage
Notice how in the first picture it looks like enough sausage to feed an army? Well that’s because these pics were taken on two separate occasions.  The first in which we had friends over and I needed enough to feed three boys (my husband included) that I swear are still growing.  This last picture is from the most recent time, with one package of sausage.
After the sausage is finished cooking, use a slotted spoon to remove the sausage from the pan.  DO NOT drain the sausage.  This is the biggest mistake people make.  You lose the grease that you need to make the gravy, and lose the flavor in the process.
Once you have removed the sausage you should have about 1/4 cup of grease left.  Now here’s where it gets tricky.  Use a cheapo sausage like me and you’ll probably have about 1/4 cup of grease.  Use an expensive sausage that is very lean and you could have significantly less grease.  See what I meant when I said this recipe was hard to write??  Anywho…the key to making your gravy is you want equal parts flour and grease.  To make a tasty gravy you need to cook the flour and grease together for a few minutes so that you get rid of that chalky flour taste.  Turn the burner on medium heat and sprinkle in your flour.   Here is where you need to use your judgment.  I wouldn’t suggest dumping 1/4 flour in…just do a little at a time.  Whisk together the grease and flour and you should have a thick mixture that is bubbly.  If it is forming gigantic clumps it’s too much flour (so add some butter to even out)…if it looks like water, add some more flour.  It should stay together in the center of the pan like this, but also spread out a little on its own when you stop whisking.  Trust me, the more you make this the better you will get at it!
cooking flour2
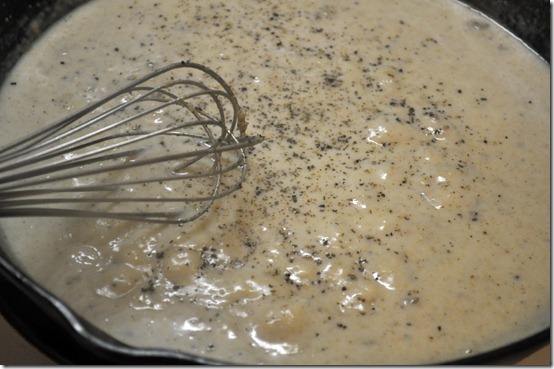
So while you are letting your flour/grease mixture cook for about 5 minutes (not too high, we don’t want to burn it!!) dump in a ton of cracked black pepper.  You can always add more later but here is where I add mine in…again, about a half palm-full.  I think this makes a difference because it helps the pepper flavor cook into the gravy instead of just seasoning the gravy at the end.  Make sure your heat is set to medium (maybe a little lower if you are using a cast-iron skillet, those suckers retain some heat!) and start to slowly whisk in your milk.  You want to whisk while you are pouring it in so you don’t scald the milk.  The gravy will keep thickening because of the flour and you  just keep whisking in the milk and cooking it until it gets to the consistency you would like.  Again, this is a slow process.  Gravy made with love.  And grease.  Seriously is there anything better??
gravy
And it will be beautiful, and bubbly, and you can add in more pepper if you are feeling crazy.  Then stir your sausage back in and take those amazing biscuits out of the oven, break one apart (or two, or three, or even four. My growing boy would suggest stopping at 4 though, otherwise you have to move buttons on pants, and it isn’t pretty) and spoon some of your gravy over the top.  Then put your feet up and enjoy the awesomeness of this gravy.  Well worth your time in my opinion!
A few tips: Don’t add any salt until after you add the sausage back in.  Sometimes it need salt, sometimes it doesn’t.  Also I usually do things in this order and it comes out just right…Turn on the oven, cut the biscuits, cook the sausage, put biscuits in the oven, make the gravy while biscuits are cooking, stuff your face.

Biscuits and Gravy
printable recipe
yields approx. 8 biscuits and gravy

Ingredients:
1 lb. sausage
1/4 cup flour (approx.)
cracked black pepper
salt (optional)
2 cups milk (approx.)
8 biscuits

Directions:
Crumble and cook sausage in a large skillet over medium heat until browned.  Remove sausage from pan, and leave drippings.  Whisk in flour until dissolved and continue to let cook for 5 minutes.  Add in pepper to taste.  Gradually whisk in milk and cook gravy until thick and bubbly.  Stir sausage back in and season with more salt and pepper to taste.  Serve over hot biscuits.  Refrigerate leftovers.
Pin It!

Wednesday, June 29, 2011

Update on Couponing


Well, I tried it...more than once.  And while I'm not extreme, I have definitely filled our pantry and saved a lot of money in the process.  For those of you out there that are considering using coupons I figured I would come up with some Peaks and Pits for you.  I'm no expert, but I have gotten better about it and more organized, which saves me A LOT of time.  Will I be able to do this consistently? Probably not once school starts...but for me it's a challenge and I actually enjoy it.  Gasp!

Peaks:
  • Having a well-stocked pantry before school starts back up
  • Stocking up on items I need for my frozen food frenzy in October
  • Not having to run to the store and pay a ridiculous price for something I really need for a recipe
  • Saving $ - In two trips I've paid $160 for about $320 worth of groceries.  My husband commented the other day, "dang our bank account is looking better and better what do you think that's from?"...hmmmmm maybe it's the clipping, and the organizing, and the not running down the road to the store because we have to have guacamole with our dinner and spending $25 on the ingredients because the local store is price gouging. 
  • The skills I'm perfecting will come in handy with kids someday
Pits (more like rants):
  • Extreme couponing (like the tv show) is NOT real life.  In real life, you go to the store and you have to buy other things as well.  My husband eats sandwiches for lunch, while I try to buy deli meat when it's on sale, I still have to get some about once a week. And cheese, and bread, and milk and other things that are on sale.  So yes, while I could probably go to the store and save 98% and walk out with 500 bottles of Powerade, I think I'll pass.  Plus who needs that much Powerade??? Which leads me to my next "pit"
  • I hate it when people clear out the shelves.  It drives me absolutely INSANE.  I live about25 minutes from the large town nearby that has a lot of the stores that double coupons and has a Walgreens.  Just because you can get the body wash for free doesn't mean that you need all 100 that are on the shelf and in the back of the store.  I've learned that ads come out on Tuesday nights.  Apparently if you are not in the store by 6 am the next day (day after Thanksgiving style) you will not get that body wash.  And honestly I don't need body wash enough to haul my happy butt from store to store trying to get my hands on it.  This my friends, is for those that have no life, and have probably cleared out the shelves in those other stores anyway.  Why waste my gas?
  • The TV show has people in a tizzy! Disclaimer: I have always desired to use coupons.  My mom used them growing up and I mentioned using them when we got married then didn't get around to it...i.e. got lazy.  So before you jump on me and say "well you only coupon because of the show"...you're only partially right...The show intrigued me, and a lovely book I ordered taught me the skills I need to know to save $.  The book is realistic.  Unless you live in the city and have the time during the day, every day, to check local stores, there is NO WAY you will see more than 30-50% savings.  I hit the 60% mark my first trip...but haven't since and it doesn't bother me! Yes I said it.  I'm really happy that the time I have spent clipping, organizing, and making my shopping list has led to 50% savings in groceries.  Pumped.  Elated.  Dancing while I put away my groceries...
  • Another reason why the show isn't real life...I'm going to say this in the kindest way possible...The stores are letting them get away with big no-no's for publicity.  If you look on most coupons it says "Limit 4 Per Transaction"...And a lot of stores say "Limit 3 per customer" for items that are on super sale.  So these stores that are letting people come in and buy 150 boxes of Excedrin (which seriously, I know they donate a lot of that stuff, but golly if I had that many headaches maybe I would rethink couponing) are really just doing it for the show. 
  • People stealing inserts out of the newspapers.  Seriously? Seriously?? If you can't pay $1.50 for a newspaper and STEAL the inserts out of it...you are seriously bordering on Kathy Bates in Misery.  I don't pay for my inserts, but I sure as heck don't steal them!  I have family and friends that get the Sunday paper that don't coupon.  But when I do need to go buy a Sunday paper, I would like for my inserts to be there, it's not too much to ask I don't think...
So there you have it...my thoughts on couponing.  I'll probably keep doing it, but I'm not going to devote my life to it like a full time job.  I just have too many other things I enjoy...
Pin It!

Monday, June 27, 2011

Easy Tuna Salad + Why It's Hard to "Recipe"


Yes I'm alive.  To all 7 of you who were wondering, things have just been a little crazy around here lately.  I've been working on building my invitation business and between that, coaching, and trying to keep the house clean, I haven't had much time to "recipe"...And speaking of that, I am finding it more and more difficult to write recipes.  I struggle because most of the things I make on a daily basis don't involve recipes, I just "know" what is good.  That's the thing about cooking...I really feel like anyone can cook with a recipe, but it does take time to develop skills in order to know what flavors taste good together.  I am still learning that every day, and it will never get old.  I didn't go to culinery school, but I can tell you what my grandma did...problem is, my grandma doesn't go by recipes either.  So therein-lies the problem. 

I don't bake a lot of sweets, it just isn't my thing.  I love salty savory dishes, and by the time I sufficiently stuff myself on my meal, there is literally no room for dessert.  Although there is that sick twisted game I play with myself when it comes to snacks, like "oh I just ate that entire bag of salty chips, I have to balance it out with something sweet"...and back and forth I go until I'm unbuttoning my pants.  It ain't pretty... Anyway, back to the savory dishes...with savory, I don't really feel like a recipe is absolutely necessary.  Unlike desserts, where if you add the tiniest bit too much salt you end up with chocolate chip cookies that make your dad cringe.  Just a little side note: If you are 10 years old and making cookies alone for the first time...pay attention.  1/2 teaspoon and 1/2 cup are NOT interchangeable when it comes to salt.  Thankfully I have the best dad, that said..."Yummmmm, but I think they might be a little on the salty side"...Oh well.  Lesson learned!

To get back on track, this is why I enjoy making savory meals (hence the name of this blog)...I throw out a dessert every once in awhile, but it's rare.  And it usually involves something seasonal, like berries,or happens to fall around a holiday.  The reason I love savory dinners are because there's not much science to it, except my tastebuds.  So I'm going to try REALLY hard to write recipes for my favorite things, things I make probably a little differently each time.  But don't be surprised if there is more emphasis on technique and taste, than actual recipes.  It's really all about how it tastes after all. 

Tuna Salad Sandwiches
Printable Recipe

Yield: about 2 sandwiches
Ingredients:
1 can chunk light tuna in water (drained)
1 hard boiled egg
1/4 cup mayonaisse
salt and pepper to taste
splash of lemon juice

bread
lettuce
tomato (if you don't notice the tomato in the picture that's because it is missing.  Because I am holding out for fresh tomatos from the garden.  It's very difficult)
extra mayo
Directions:
1.  Peel the egg and chop it up.  I like the egg very finely chopped, so if I'm making a big batch I usually pulse the eggs in the food processor.  If I am making 1-2 sandwiches, I usually press my fork into the chopped egs to mash them up.
2.  Mix all the rest of the ingredients together, adding more of each depending on your taste.  If you have a little bit of celery this is delicious finely chopped and added in.  Refridgerate until ready to use.
3.  Make your sandwich.
Pin It!

LinkWithin

Related Posts Plugin for WordPress, Blogger...